
In other articles I’ve discussed the process of integrating data from various sources into IBM Planning Analytics. This time, I want to offer a simple strategy for automating the inflow of data “dropped onto” a File Transfer Protocol (or FTP) site. Since the File Transfer Protocol is a standard communication protocol commonly used for the transfer of data files from a source to a client, sooner or later you will come across a scenario where files may be sitting in a secured FTP folder waiting for you to download and consume.
Validating “the Drop”
I always begin by using an FTP Client tool such as FileZilla to “validate the drop site”. With FileZilla, you enter the IP or Computer name of the host site, the required credentials and port number and click connect. This allows you to validate the information provided: host URL, authentication credentials (Username and Password) as well as the host’s folder structure. You should go through the exercise of uploading and downloading a file from the location to make sure that you can access the site successfully, and files can be transferred to and from (the site) without affecting content or encountering performance degradation.
Automating with PowerShell
Since there currently is little support for FTP automation offered directly in Planning Analytics, we can use PowerShell. PowerShell is a task automation and configuration management program from Microsoft, consisting of a command-line shell and a associated scripting language. PowerShell is an obvious choice for automating the process of downloading files from an FTP site to a place where Planning Analytics can consume them and PowerShell can also perform any tasks required to move, reformat or otherwise prepare the data for loading, including supporting PGP encryption.
If we commit to using PowerShell as a solution, than the Windows PowerShell Integrated Scripting Environment (ISE) (a host application for Windows PowerShell) is my scripting tool of choice. In this ISE, you can run commands and write, test, and debug scripts in a single Windows-based GUI (graphic user interface). To access the ISE, you click Start, select Windows PowerShell, and then click Windows PowerShell ISE (alternately, you can type powershell_ise.exe in any command shell or in the Run box).
Get Busy Scripting
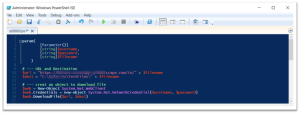
We NEVER want to “hard code” anything in any program or script, therefore, we’ll build a script with the ability to accept runtime parameters. In this exercise I am going to store a username and password in a secure global cube (within Planning Analytics) and then pass those values into the script at runtime. In addition, I want to use this script to download any file (in a predetermine location) so I’ll add a 3rd parameter for the filename that I want to download. PowerShell parameters are always enclosed in a param block defined with the param keyword, followed by opening and closing parentheses, so the top of our script will look like this:
param(
[Parameter()]
[string]$username,
[string]$password,
[string]$filename
)
Cheating a Bit
I said never hard code, but for this exercise I AM going to go against that and define 2 “hardcoded variables” (hardcoded because I have a specific source and destination and “variable” because I will use the filename parameter value to “qualify” it). $url is the source (the URL and filename we want to download) and $dest is the target (where the file will be downloaded to):
# — URL and Destination
$url = “https://jims.solidftp.scape.com/in/” + $filename
$dest = “C:jimsftpdownloadsTestFiles” + $filename
Let’s get to the Downloading!
With PowerShell, it’s all about using its “library” of cmdlets. A cmdlet is a lightweight command that is used in the PowerShell environment (almost like a “mini” script or program invoked by a single line of code). The PowerShell runtime invokes these cmdlets “within the context” of automation scripts that are provided at the command line. The PowerShell runtime also invokes them programmatically through PowerShell APIs.
Windows PowerShell doesn’t have any cmdlets specifically designed to download Internet data, however, PowerShell can be object oriented, so we can use the New-Object cmdlet to create an object using the System.Net.WebClient class and expose common methods for sending and receiving data from any local, intranet, or Internet resource identified by a URI:
# — create an object to download file
$web = New-Object System.Net.WebClient
Note that in the script above the object is “stored” in the variable named $web. The next step is to set the objects Credentials property with the network credentials that will be sent to the host and used to authenticate our download request:
$web.Credentials = new-object System.Net.NetworkCredential($username, $password)
Finally, DownloadFile is the method that will invoke the actual process of downloading the file that we specified:
$web.DownloadFile($url, $dest)
Our “complete” script might look like this:
Testing
It is always important to take things “in steps”, meaning, first I used FileZilla to confirm that the URL and network credentials were correct and working. Now I will manually run the PowerShell script we just created and see if it can successfully download a file. To do this we can type into the console the following:
.myposwerd.ps1 -username apptm1jim -password tH8Bg6ehtoNyfLD9vOV -filename TM1_Integration_Report_Output.csv
This should execute our script passing it the 3 parameters we described earlier:-username, -password and -filename (a file named “TM1_Integration_Report_Output.csv”). It is assumed that the file exists on the FTP site and in the “/in/” folder.
By default, PowerShell scripts are “unsigned” meaning they do not automatically have a digital signature. A “digital signature” is a type of electronic signature that’s secure and can be authenticated, indicating that the script can be run on a system, safely. Since we are not publishing our script to multiple consumers, we can avoid the process of having to create a digital signature by setting a specific execution policy on the specific system that the script will be executed (running as an unsigned script). To run unsigned scripts, you must change the execution policy using the Set-ExecutionPolicy cmdlet. You may need to alter the specific execution policy based upon a particular client’s security program or plan. Start out by running Get- ExecutionPolicy to see the current policies and scopes:

Adding PGP Encryption
Along with securing the FTP folder (using a User and Password), the files coming and going in the folder should be encrypted. Pretty Good Privacy or “PGP” is an encryption program that provides cryptographic privacy and authentication for data communication. PGP is used for signing, encrypting, and decrypting texts, e-mails, files, directories, and whole disk partitions and to increase the security of e-mail communications. PGP adds a second layer of security to a solution and thankfully, PowerShell makes dealing with PGP quite easy.
Start with a Key
To implement PGP, a PGP key must be generated which you will use to sign and encrypt files. When you create a PGP key, a keypair (consisting of a public key and a private key) is generated. You can share the public key with anyone who wishes to send you encrypted files, but the private key must be known only to you and used to decrypt received files. You can use tools such as GoAnywhere Open PGP studio to create a PGP keypair or, like I did, use PowerShell commands available it modules such as PSPGP, which is a PowerShell module that provides PGP functionality in PowerShell allowing encryption and decryption of files/folders and strings using PG.
Note: The PowerShell system is already available within the Windows operating system, and you probably already have many modules available (if you are not sure, at the PowerShell prompt, type Get-Module –ListAvailable to see which modules are available for you to use). If a particular module is not available (such as PSPGP), you can install it by using the Get-InstalledModule cmdlet.
You can use the New-PGPKey command in a PowerShell script to generate a PGP Key Pair (pick your own UserName and Password):
# — create a new PGP key
New-PGPKey -FilePathPublic $PSScriptRootKeysPublicPGP.asc -FilePathPrivate $PSScriptRootKeysPrivatePGP.asc -UserName ’69przemyslaw.klys’ -Password ’69ZielonaMila9!’
Below is the key pair generated by the above script:

Decrypting with PGP
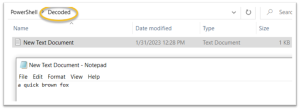
Once you have generated your key pair (and shared the Public key) you can use the Unprotect-PGP cmdlet to decrypt files. The following script demonstrates the decryption of a file (Encoded – is where the encrypted file resides and Decoded – is where the decrypted file will be written):
# — use PGP key to decrypt the file
Unprotect-PGP -FilePathPrivate $PSScriptRootKeysPrivatePGP.asc -Password ’69ZielonaMila9!’ -FolderPath $PSScriptRootEncoded -OutputFolderPath $PSScriptRootDecoded
A simple test result is shown below – before decryption:

And after decryption:
TurboIntegrator
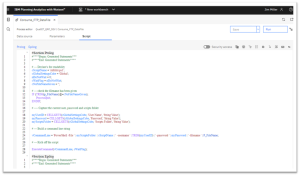
The last step (in this exercise) is to use a TurboIntegrator process to initiate the PowerShell script we wrote. If you are comfortable with Planning Analytics, it should make sense and be straight forward.
The key points are:
- Never “hard code” anything; especially usernames and passwords – place them in a secured “global cube”.
- Create a specific folder where you’ll place this and any future developed PowerShell scripts and read this folder name and location from the Global cube.
- Use the variable values to create a command line string.
- Use Planning Analytics ExecuteCommand function to execute the command line string.
Below is an example of a working TurboIntegrator script that meets the basic requirements:
It’s a Wrap
I believe that these are all of the key pieces required to demonstrate a simple strategy of automating the integration of data from FTP Sites to IBM Planning Analytics (except of course a TurboIntegrator process to actually load a cube from the downloaded and decrypted CSV file and perhaps a chore to run everything on a schedule). Enjoy!