
Planning Analytics (PA) is a great platform for building models, such as workforce planning, revenue planning, and capital expenditure. These models require data from other systems. The cloud version of PA provides many data integration methods. However, a flat file is still useful when other data integration methods are not possible. To upload a file to Planning Analytics (Could), a user can use the Planning Analytics Workspace interface, Remote Desktop Connection, or File Transfer Protocol (FTP) tool. In this article, we will review how to upload a file through an FTP tool and the possibility to eliminate the manual steps when uploading files from another system to Planning Analytics (Cloud).
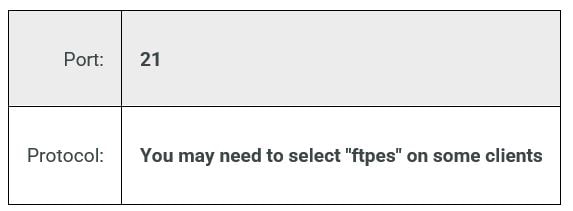
The FTP tool that we will use in our example is FileZilla, but other FTP tools will work as well. Before configuring the FTP tool, we should collect the PA server information from its welcome kit. We need the username and password of the shared drive and the server URL. Please find the sample information below.

servername.planning-analytics.cloud.ibm.com
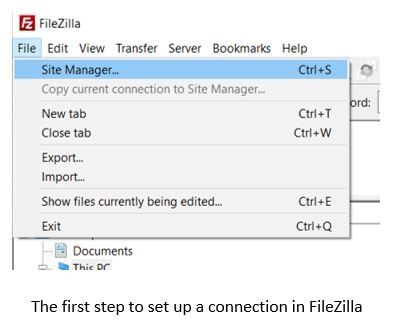
The first step is to set up the connection to the PA shared folder which is on the cloud. After open FileZilla, click “File” at the top left and then select “Site Manager” to create a new site or the new connection to the shared folder. Click “New site” and named it “Sample PA Connection”, for example.
The next step is to configure the connection, which is called “Sample PA Connection” in our example. By default, the protocol for the shared folder is FTP but IBM can reconfigure the protocol upon request. The host name and port of the shared folder are found in the welcome kit in the Planning Analytics Shred Folder section. We will select “User explicit FTP over TLS if available” for the encryption.
There are many types of logon settings, and we use “Ask for password” in our example. This logon type will prompt the user to enter the shared folder password for every connection. The username and password of the shared folder are found in the PA welcome kit under the “User names and password” section.
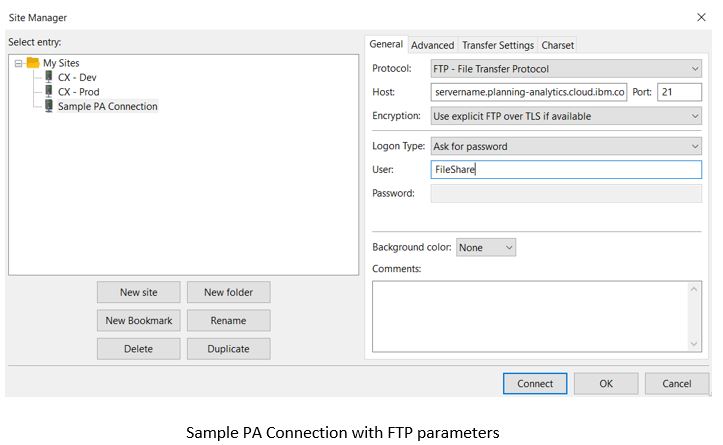
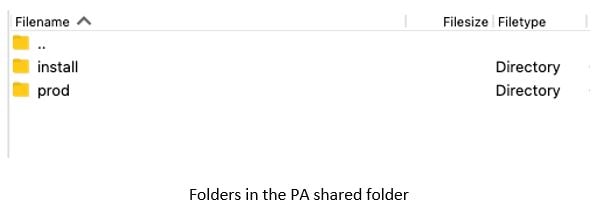
Based on the previous steps, we have entered all parameters required to connect to the PA shared folder. We can click “OK” to save the connection or “Connect” to start the connection. If we start the connection, FileZilla will connect to the PA share folder. If the connection is established, we will see the list of PA folders in the shared folder in the bottom right window. The default folders are “install” and “prod”, but a PA developer may add more folders to the shared drive.
The last step is to upload a file to the PA shared folder. We will want to navigate to the target folder first before we upload the file. For example, if we want to upload a file to the folder called “model_upload”, we will open the “prod” folder, the “Data” folder, and then the “model_upload” folder (…/prod/Data/model_upload/) before we drop a file to the folder. Uploading a file is as simple as dragging a file from the user’s laptop to FileZilla and then dropping the file into the “model_upload” folder in PA (Cloud).
Although uploading a file to PA (Cloud) requires many manual steps, we can potentially eliminate the manual steps by using the knowledge from the FTP setup combined with the automation or scheduler in another system. The best way to remove the manual steps is to export a file directly from the source system to the PA shared folder. Instead of populating the FTP parameters to FileZilla, a developer will configure the source system/application to export the data file to the PA shared folder. If this method is not possible, a developer can also export a file from a source system to another FTP server and then schedule a job to upload the file from the FTP server to the PA shared folder. These are sample solutions which will eliminate the manual steps, but the technical details of these methods are beyond the scope of this article.
In conclusion, the information in the PA (Cloud) welcome kit allows us to upload a file to the PA shared folder. A model in PA may require data from another system so the file upload becomes a regular task for a user or an administrator. A tool like FileZilla helps us to easily perform the upload with a few simple steps after the initial setup. If we want to eliminate the manual steps, we can configure the source system to directly export a file to the PA shared folder through FTP. Using another FTP as a middleman to schedule the upload to the PA shared folder is also possible.