
A Virtual Machine or “VM” is a computing resource that uses software instead of hardware to run programs and deploy apps. Azure virtual machines enable you to swiftly create dedicated computing resources that can be used just like any physical desktop or server.
Choose Your Method
Azure virtual machines (VMs) can be created through the Azure portal which provides a simplified “browser-based” user interface, however this method is a manual step-by-step approach that isn’t easily automated.
More realistically, you would use the Azure command-line interface (Azure CLI) to create and manage Azure resources (such as Azure VMs). Azure CLI is supported across Azure services and is also designed to be pretty straight-forward but has an emphasis on automation.
Azure CLI and Azure PowerShell
Azure CLI is a cross-platform command-line program that connects to Azure and executes administrative commands on Azure resources. Azure PowerShell is a “module that you can add” to MS Windows PowerShell that enables you to connect to your Azure subscription and manage resources.
Azure CLI has an installer that makes its commands executable in all four shell environments while Azure PowerShell is set of cmdlets (small, lightweight commands that are used in the Windows PowerShell environment) packaged as a PowerShell module named Az, not an executable.
What To Do
In this post I want to illustrate the process of using Azure CLI commands to deploy a virtual machine in Azure that runs Windows Server 2019. Additionally, I want to show how to create a Windows virtual machine by using an Azure Resource Manager template and Azure PowerShell from the Azure Cloud shell.
Launch Azure Cloud Shell
The Azure Cloud Shell is a free interactive shell that you can use to run the steps in this article. It has common Azure tools preinstalled and configured to use with your account. To open the Cloud Shell, you launch a separate browser tab and go to https://shell.azure.com/bash. From there, you can paste in or type commands and then press Enter to run them:

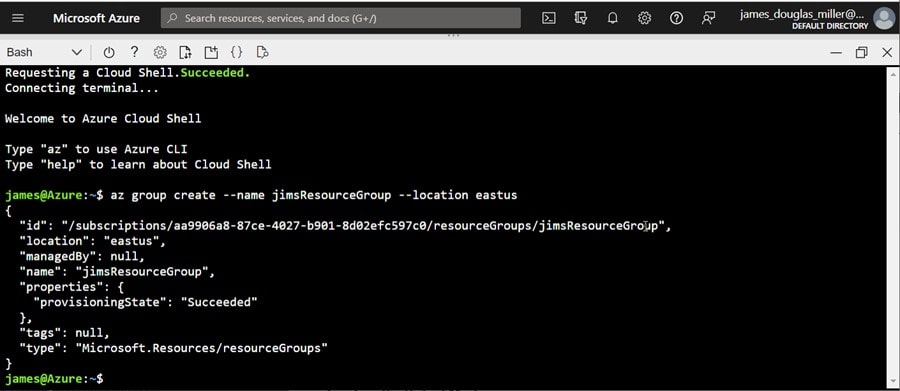
Creating an Azure Resource Group
You need to first create an Azure resource group for the VM to reside in. To do that you can use the az group create command. An Azure resource group is a logical container into which Azure resources are deployed and managed (in this case our VM). I used the following command to create a resource group named jimsResourceGroup in the eastus location:
az group create –name jimsResourceGroup –location eastus
Creating the Virtual Machine
Once we have a resource group setup, we can create the VM with the az vm create command. The following code creates a VM named jimsVM and uses jamesdouglasmiller for the administrative username. When you run the commands, you are prompted to enter a password at the command line. The username and password will be used later when you connect to the VM.
az vm create –resource-group jimsResourceGroup –name jimsVM –image Win2019Datacenter –public-ip-sku Standard –admin-username jamesdouglasmiller

It takes a few minutes to create the VM and supporting resources. The following is the output showing the create was successful (note the publicIpAddress here since this will be the address to use to access the VM):
{
“fqdns”: “”,
“id”: “/subscriptions/aa9906a8-87ce-4027-b901-8d02efc597c0/resourceGroups/jimsResourceGroup/providers/Microsoft.Compute/virtualMachines/jimsVM”,
“location”: “eastus”,
“macAddress”: “00-22-48-28-4B-A5”,
“powerState”: “VM running”,
“privateIpAddress”: “10.0.0.4”,
“publicIpAddress”: “20.84.15.119”,
“resourceGroup”: “jimsResourceGroup”,
“zones”: “”
}
Open port 80 for web traffic
By default, only RDP (Microsoft Remote Protocol) connections are opened when you create a Windows VM in Azure. Since I want to run Internet Information Server on the VM, I used the az vm open-port command to open TCP port 80 which the IIS web server will need:
az vm open-port –port 80 –resource-group jimsResourceGroup –name jimsVM
Connect to the VM
Now that the VM is created and up and running, you can use Windows RDP on my client computer to connect to it using the public IP address and credentials we setup earlier:


Installing a Web Server
To install a web server on the VM, you can use a PowerShell prompt on the VM to run the following command:
Install-WindowsFeature -name Web-Server -IncludeManagementTools


When done, you’ll have IIS installed and port 80 open on the VM. To test things, you can use a web browser to view the default IIS welcome page by navigating to the public IP address of the VM:

Success!
Azure Resource Manager (ARM) Template
You can automate deployments (such as creating virtual machines) by using what is referred to as “infrastructure” code (for example the Azure CLI commands we used to create and configure the VM) to define the infrastructure that needs to be deployed. Just like application code, you can save the infrastructure code so that you can reuse the code and deploy similar VMs at any time.
Azure takes things a bit further by implementing infrastructure code reuse by using Azure Resource Manager templates (ARM templates). The template is a JavaScript Object Notation (JSON) file that defines the infrastructure and configuration for a resource.
These templates use declarative syntax, which lets you state what you intend to deploy without having to rewrite the commands to create it.
The following example shows how you simply specify the resources to deploy and the properties for those resources. The TemplateUri parameter indicates which template will be used (in this case an Azure Quickstart template which defines an Azure Generation 2 VM.
$resourceGroupName = Read-Host -Prompt “Enter the Resource Group name”
$location = Read-Host -Prompt “Enter the location (i.e. eastus)”
$adminUsername = Read-Host -Prompt “Enter the administrator username”
$adminPassword = Read-Host -Prompt “Enter the administrator password” -AsSecureString
$dnsLabelPrefix = Read-Host -Prompt “Enter a unique DNS name for the public IP”
New-AzResourceGroup -Name $resourceGroupName -Location “$location”
New-AzResourceGroupDeployment `
-ResourceGroupName $resourceGroupName `
-TemplateUri “https://raw.githubusercontent.com/Azure/azure-quickstart-templates/master/quickstarts/microsoft.compute/vm-simple-windows/azuredeploy.json” `
-adminUsername $adminUsername `
-adminPassword $adminPassword `
-dnsLabelPrefix $dnsLabelPrefix
(Get-AzVm -ResourceGroupName $resourceGroupName).name