
Expense allocations in NetSuite offer a powerful way to automatically distribute expenses across departments, locations, or other organizational segments. This functionality helps streamline financial processes, improve reporting accuracy, and support compliance with internal accounting policies.
What is Expense Allocation?
Expense allocation is the process of dividing a single expense among multiple accounts or segments based on predefined rules or percentages. By using allocation schedules, organizations can ensure costs are recorded in the appropriate areas, leading to more accurate financial management and reporting.
Types of Expense Allocation:
NetSuite offers two allocation methods: Fixed and Dynamic.
Fixed Rate Allocation: This method requires you to define set allocation percentages that remain consistent throughout the entire lifecycle of the allocation schedule.
Dynamic Allocation: This approach allows you to assign a statistical account to a single or intercompany allocation schedule. It’s particularly useful for advanced costing methods, such as activity-based or usage-based costing, as well as for managing cost and profit centers. The allocation weights are calculated dynamically based on the statistical account balance, either from statistical journals or a defined value, at the time the allocation journal is created.
In this example, we’ll walk through a simple Fixed Rate Allocation. More detailed guidance on setting up Dynamic Allocations will be covered in a future article.
Setting Up Expense Allocations in NetSuite
To use expense allocations in NetSuite, certain prerequisites and steps need to be followed:
- Enable Features:
- Ensure that you have the Advanced Financials Addon module for NetSuite. This is required to use Expense Allocations.
- Go to Setup > Company > Enable Features.
- Under the Accounting subtab, ensure the Expense Allocations feature is enabled.
- Create Allocation Schedules:
- Navigate to Transactions > Financial > Create Allocation Schedules
- Define the allocation schedule, specifying the allocation name, frequency (e.g., monthly), and the period during which the allocation should occur.
- Define Allocation Rules:
- Specify the source account from which expenses will be allocated.
- Define the target accounts, departments, locations, or classes, along with the percentage of the total expense that should be allocated to each.
Example of Expense Allocation
Consider a scenario where a company incurs a monthly rent expense of $10,000, which needs to be allocated across three departments: Administration, Sales, and Finance, based on the following distribution percentages:
- Administration: 50%
- Sales: 30%
- Finance: 20%
Here’s how you can set this up in NetSuite:
- Create an Expense Allocation Schedule:
- Name: Monthly Rent Expense Allocation
- Frequency: Monthly
- Next Date: May 31, 2024
- Define Allocation Rules:
- Source Account: Rent Expense
- Target Account: Rent Expense
- Allocation weight based on each department
- Administration: 50%
- Sales: 30%
- Finance: 20%
Steps to Create the Allocation in NetSuite:
-
- Navigate to Expense Allocations:
- Go to Transactions > Financial > Create Allocation Schedules.
- Enter Allocation Header Details:
- Enter the allocation Name (e.g., “Monthly Rent Expense Allocation”).
- Set the Frequency to “Monthly“.
- Specify the Next Date for the allocation to trigger.
- Remind Forever: Check this box if you wish to have this allocation execute each period based on your frequency selected without end.
- Number Remaining: Enter a number of times that this allocation rule should execute based on the frequency selected. If you checked the box for remind forever, using this field is not required.

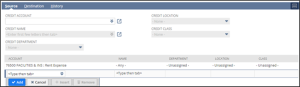
- Define Source Accounts:
- Source subtab: Select the Rent Expense as the source account. You can also add additional filters such as Entity (Name), Department, Location and Class. In our example we are going to allocate all expenses for this account and therefore leave the classification fields empty.
- Source subtab: Select the Rent Expense as the source account. You can also add additional filters such as Entity (Name), Department, Location and Class. In our example we are going to allocate all expenses for this account and therefore leave the classification fields empty.
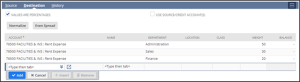
- Define Target Accounts:
- Destination subtab: Add lines for each target account, specifying the corresponding departments (Administration, Sales, Finance) and allocation percentages (weight).
- Destination subtab: Add lines for each target account, specifying the corresponding departments (Administration, Sales, Finance) and allocation percentages (weight).
- Save and Schedule:
- Review the allocation setup and save the allocation schedule.
Once set up, NetSuite will automatically allocate the rent expenses across the specified departments each month based on the defined percentages. This automation reduces manual entry, ensures consistent application of allocation rules, and improves accuracy in financial reporting.
- Navigate to Expense Allocations:
Benefits of Using Expense Allocations
- Accuracy: Expenses are accurately reflected in the appropriate departments or segments.
- Efficiency: Automates repetitive allocation processes, saving time and reducing errors.
- Better Financial Insights: Provides detailed insights into departmental spending, supporting better decision-making.
- Compliance: Helps maintain compliance with internal accounting policies and external regulatory requirements.
Expense allocations in NetSuite provide a powerful way to handle complex expense distribution across an organization. By automating these processes, businesses can improve accuracy, increase efficiency, and gain better visibility into their financial performance. Implementing expense allocations involves enabling the appropriate features, setting up allocation schedules, and defining allocation rules, all of which help simplify the management of shared costs. For more in-depth details and step-by-step instructions, refer to NetSuite’s official documentation and support resources.