
Creating Child Custom Records in NetSuite
There are many situations in NetSuite where you may want to create custom records that are directly related to other records, such as transactions, entities, items, or additional custom record types. These relationships are especially useful when you need to store multiple values tied to a parent record and display them as a sublist on a form, with the parent value automatically defaulted when creating new records.
In this article, we’ll walk through how to create a custom record that functions as a child of both an Item record and a vendor record. For this example, we’ll use the tracking of Sales Performance Incentive Funds of SPIFFs and associate this custom record with items and vendors.
Prerequisites
To keep the focus on record relationships, this article assumes you have already created a custom record to store SPIFF details. We will not cover the full configuration options for custom records, but the same principles apply regardless of the record’s purpose.
Making a Custom Record a Child of Another Record
To associate a custom record as a child of another record type (such as Vendor), you must create a parent field on the custom record.
Step 1: Open the Custom Record
- Navigate to Customization > Lists, Records & Fields > Record Types
- Open your custom SPIFF record in Edit mode
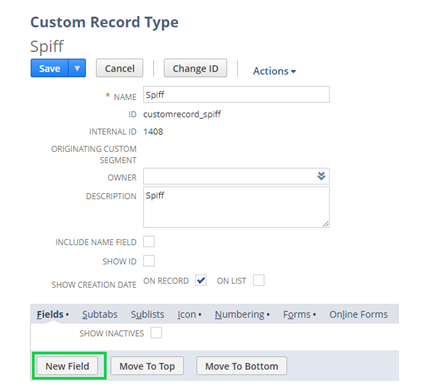
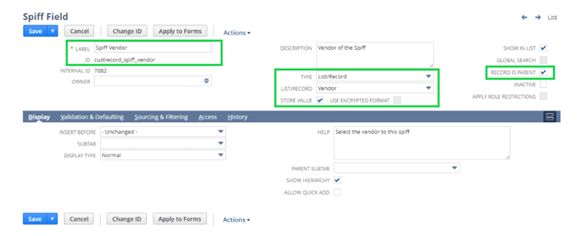
Step 2: Create a Parent Field
- Click New Field
- Configure the field as follows:
- Label: Vendor
- ID: custrecord_spiff_vendor (example)
- Type: List/Record
- List/Record: Vendor
- Store Value: Checked
- Record is Parent: Checked
Important: Checking Record is Parent establishes the parent-child relationship between the custom record and the Vendor record.
3. Click Save
Your custom record is now officially a child of the Vendor record.
Displaying the Child Records on the Vendor Form
Now that the relationship exists, the next step is to expose the custom records on the Vendor form so users can view and create SPIFF records directly from a vendor.
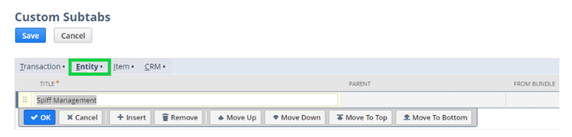
Creating a Custom Subtab
- Navigate to Customization > Forms > Subtabs
- Click Entity
- Create a new subtab:
- Title: SPIFF Management
- Click OK, then Save
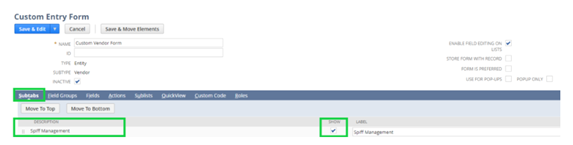
Updating the Vendor Entry Form
Next, we’ll modify the Vendor form to display the new subtab and the SPIFF custom record.
- Navigate to Customization > Forms > Entry Forms
- Edit the Vendor form you want to customize (typically the preferred form)
- On the Subtabs sublist, ensure SPIFF Management is visible, and the Show box is checked
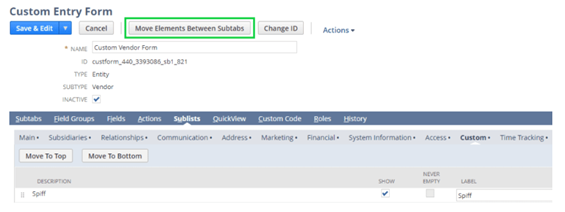
Moving the SPIFF Custom Record to the New Subtab
By default, new custom sublists appear under the Custom subtab.
- On the Vendor form, click Sublists > Custom
- Locate the SPIFF custom record sublist
- Click Move Elements Between Subtabs
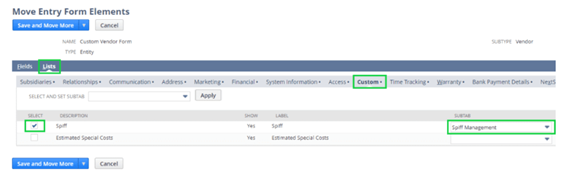
- Select:
- Lists > Custom
- Check SPIFF
- Choose SPIFF Management from the subtab dropdown
- Click Save
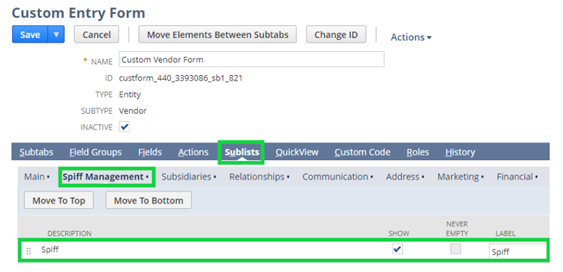
Final Result
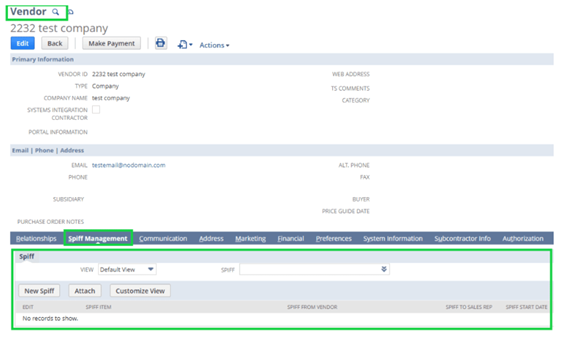
The SPIFF custom record sublist now appears under the SPIFF Management subtab on the Vendor form. When viewing or editing a Vendor record, users can:
- View all related SPIFF records
- Create new SPIFF records directly from the Vendor
- Automatically default the Vendor value on new SPIFF records
Because the SPIFF record is configured as a child of the Vendor record, NetSuite handles the relationship automatically.

Why This Matters
This configuration is a powerful way to extend standard NetSuite records using related custom records. It improves data organization, simplifies data entry, and provides a clean user experience by grouping related information directly on the parent record.
The same approach can be used to relate custom records to Items, Transactions, or other entities by following the same steps outlined above.