
Mismatches between what you ordered and what you were billed, whether in price, quantity, or exchange rate, often leave messy balances in your Accrued Purchases account. If you have Advanced Receiving enabled in NetSuite, you can easily clean up these discrepancies. This process generates journal entries that move variances to the correct accounts, ensuring your financial reporting remains accurate and transparent.
Type of Variances:
There are three types of variances that NetSuite will check for between the Receipt and the Purchase Order.
- Price Variance
- Quantity Variance
- Exchange Rate Variance
Setting Up Item Records for Variances
To be able to calculate variances for items, the following need to be set up on the item records.
- Variance Accounts
- Default Setting for Match Bill to Receipt
Variance Accounts:
To manage your variances, you’ll first need to designate GL COGS accounts for posting. On each item record, you can choose different accounts for price, quantity, and exchange rate variances, or use a single account if you don’t need to see them broken out. Once these fields, Bill Price Variance, Bill Quantity Variance, and Exchange Rate Variance, are filled in, NetSuite knows exactly where to post the discrepancies when journals are generated.
Match Bill to Receipt
Enable the Match Bill to Receipt preference on the item record to automate your variance tracking. This ensures that any purchase order featuring the item is automatically set to calculate variances against the vendor bill. If you prefer more control, leave this box clear and manually select the option only when needed on specific transaction lines.
Price Variance Transactions Example:
Below is an example of a price variance that may occur between transactions. For any of the three types of variances identified in the system, the calculations are the same, however, NetSuite allows you to designate the variance account for posting each type of variance.
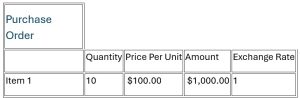
For the purchase order we add an item with the following attributes:
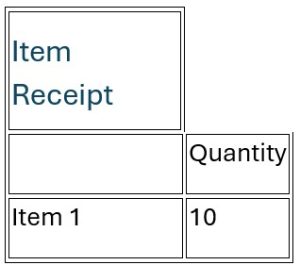
We create an item receipt and receive the items into the warehouse location with the following:
Once we receive the bill from the vendor, we enter the following into NetSuite:
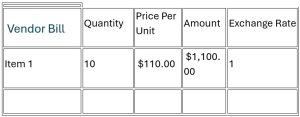
Notice that the Price Per Unit on the Vendor Bill is $10 more than the amount that was entered on the Purchase Order. This Price per unit difference will result in a variance when NetSuite compares the Total Amount of the Vendor Bill and the Purchase Order.
Transaction GL Impacts:
The GL Impact for the Item Receipt will credit Accrued Purchases and Debit Inventory for the $1000 which is the Quantity * Price Per Unit * Exchange Rate. In our example, this is (10 * 100 * 1) = 1000.

The GL Impact for the Vendor Bill will credit Accounts Payable and Debit Accrued Purchases for $1100, which is the Quantity * Price Per Unit * Exchange Rate. In our example, this is (10 * 110 * 1) = 1100.

Calculating the Variance:
NetSuite will calculate the variances using the following formulas:
- Item Receipt Amount= Quantity * Price Per Unit * Exchange Rate
- Vendor Bill Amount= Quantity * Price Per Unit * Exchange Rate
- Price Variance= Vendor Bill Amount – Item Receipt Amount As we can see, the price variance between the Purchase Order/Item Receipt and the Vendor Bill is $10 per unit which results in a total price variance amount of $100. In order to reconcile this price variance, we will need to generate a variance journal entry in NetSuite.
Posting Vendor Bill Variances and Creating Variance Journals
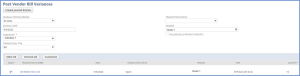
- Navigate to Transactions > Payables > Post Vendor Bill Variances
- Verify or select the posting period for the journal entry you are creating
- Verify or enter the date for the journal entry. This defaults to the current date
- Select the subsidiary of the transaction, One World accounts only
- In the Transaction Type field, make a selection to filter the list of transactions:
- Choose Purchase Order to show closed purchase order lines with a variance that do not have the Match Bill To Receipt box checked
- Choose Bill to show only vendor bills linked to Purchase Orders that have the Match Bill To Receipt box checked
- When you have selected Bill in the Transaction Type field, you can make a selection in the Transaction Status field:
- Choose Open to show all open vendor bills
- Choose Paid in Full to show only vendor bills that are completely paid
- In the Vendor field, select a vendor to filter the list to show only transactions associated with the selected vendor
- Clear the Include Bills Without Receipts box to exclude bills from the list that have no item receipts entered against them. Check this box to include all bills regardless of receipts
- Check the box in the Select column next to all transactions you want to create a variance journal entry
- Click Create Journal Entries. The Post Vendor Bill Variances Results page opens and shows the journals created by the entry. You can click the link to open the journal and see the lines posted
If you are facing any issue in the above-mentioned procedure, connect with QueBIT Experts, they will be happy to assist you.
Once you click the Create Journal Entries button, a processing screen will open that shows the status of the variance journals that are being created in NetSuite with a status. Once complete, the Journal Entry document number will display and can be opened by clicking on the record.

In our price variance example from above, we calculated a variance between the receipt and vendor bill of $100 because the per unit price on the vendor bill was higher by $10 per unit and we had a quantity of 10 units purchased.
NetSuite calculated this $100 variance and applied it to the following variance journal entry.
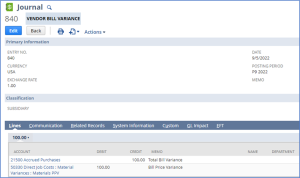
To resolve the $100 difference, the journal entry moves the balance out of Accrued Purchases (via a credit) and into your designated Price Variance account (via a debit). This cleanup ensures your accrual account remains accurate and isn’t cluttered with permanent variances.
Managing variances is a critical step in keeping your general ledger clean and your Accrued Purchases account from becoming a “black hole” of unresolved balances. By properly configuring your item records and utilizing the Post Vendor Bill Variances tool, you transform what could be a manual reconciliation nightmare into a streamlined, automated process.
Whether you choose to track price, quantity, and exchange rate variances in separate accounts or consolidate them into one, the transparency gained allows for better financial reporting and more accurate inventory costing.