
Using the Business Rules Node in Euclid Studio is an extremely effective way of managing business rules, giving you total control over their scope and impact. It’s important to understand the tool’s options and settings before adjusting or implementing new rules. In this example, we’ll go through the basic options and settings of the node.
1. Output Options:
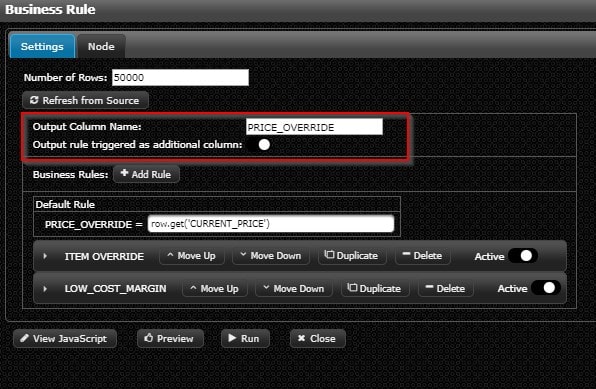
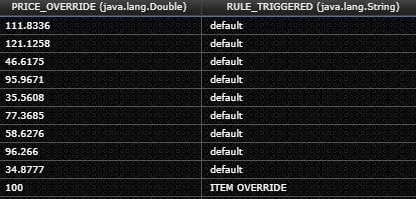
The name of the column that contains the output of your business rules is the Output Column Name. You can also select the option to trigger the output rule as an additional column by clicking the radio button. This is useful for tracking what rules are hitting each row of your data.
2. Adding a Rule:
To create a rule, click the ‘Add Rule’ button to open a new rule dialog within the node. The rules are effectively cascading IF statements, where you can set conditions using the UI. Under the IF section, you can use the dropdown menus to select a column, condition, and value. If the condition is met, the value will equal what is set in the THEN section. In the following example, we’re creating a rule that overrides a price for a specific item ID/SKU:
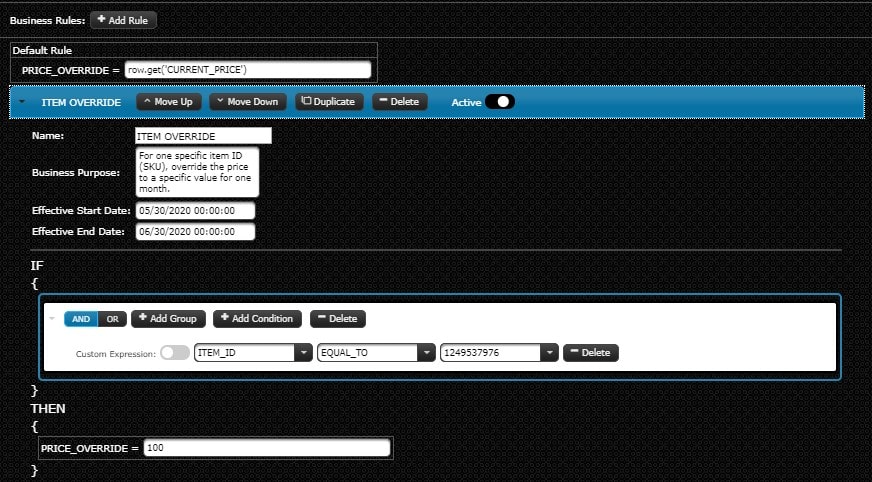
- The Default Rule is what happens when no rules’ conditions are met. This can be a static value (a number or a string), or a value based on the data using javascript. In this example, we’re using basic javascript to pull the value from the CURRENT_PRICE column using ‘row.get’. Any column name can be substituted here in place of CURRENT_PRICE.
- The Name of the rule labels the rule within the node, and what will be output if you selected to output the ‘triggered rule’ in the previous step.
- The Business Purpose is an optional description of what the rule is meant to accomplish.
- Setting an effective start and end date can allow you to only have the rule enforced for a specific time period. The end date can be left blank to enforce the rule indefinitely.
Rule logic:
A few additional points to note:
- Conditions can be added to work together using the ‘Add Condition’ button. The AND/OR buttons allow you to choose between the logical relationship between the conditions.
- Adding a group allows for multiple groups of conditions, for example if two conditions have an AND relationship, and others have an OR.
- Javascript can also be used to create a custom expression, enabled by the radio button. For example:

There are also some options at each rule’s header:
![]()
- The arrow on the left can be used to expand/collapse the rule dialog.
- The rules are processed from top to bottom, so moving up/down a rule can change it’s priority. This is useful if there are scenarios where multiple rules can be hit for a single row.
- The Duplicate function allows you to copy a rule – this can save time if a new rule is similar to an existing rule.
- Delete will remove the rule from the node.
- The ‘Active’ radio button can be used to disable/enable rules at any time.