I started a “few posts ago” exploring the topic of SQL Server encryption, beginning with Symmetric Encryption and then looking at the “Always Encrypted” feature. In the second post, I configured Always Encrypted on a column in a SQL table and stored the encryption key in the Windows certificate store on the client machine.
In this post, I use the other option (for storing encryption keys) which is to utilize an Azure Key Vault. Using this approach creates a much more scalable solution (and was more fun to implement!)
As I started in the earlier posts, Always Encrypted is an approach that ensures that sensitive data never appears as plaintext inside the database system. After configured, only client applications that have access to specific encryption keys can access the data as plaintext. This means that if the database is accessed by someone that doesn’t have the encryption key (even if they have system administrator privileges), they won’t be able to access that data!
In this post I will walk through the basics of implementing Always Encrypted on a SQL table, store the encryption key in an Azure Key Vault and then use a client application to work with the encrypted data.
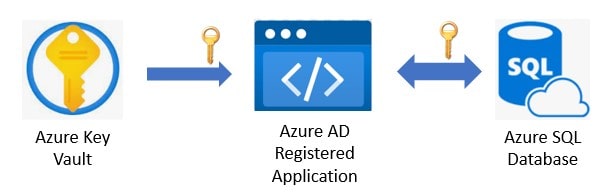
The above image depicts the concept at a very high-level. It shows an Azure AD registered application retrieving an encryption key from an Azure Key Vault and then using that encryption key to programmatically “sign in” and work with Always Encrypted data residing in an Azure SQL database living in the cloud.
Applications
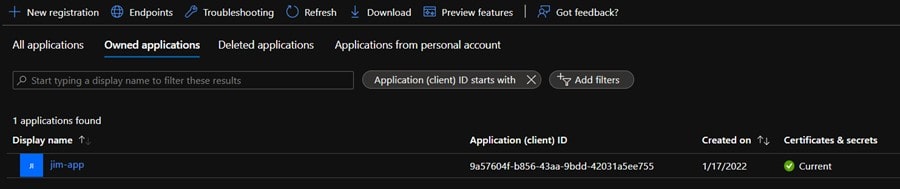
For this to work, you need to “enable” a client application to access the database by setting up an Azure Active Directory (Azure AD) application. This provides a “digital identity” (along with and some associated configurations) which informs Azure AD as to what kind of access the application which uses that digital identity will be granted (and other things). The Azure application will have an Application ID and key that ultimately the client application will use to authenticate itself. You can use the Azure Portal to easily create an Azure registered application and assign it the required Azure role. For this example I created the “jim-app” and assigned the Contributor role to it at the subscription level (for detailed steps, you can see Assigning Azure roles using the Azure portal).
Once you have an Azure Active Directory (Azure AD) application created and have assigned a role to it, you need to register it which creates an application ID and authentication key. This step also must include creating an application secret which will be the password that the client application will use to access the Azure key vault.
Azure Key Vault
After the Azure Active Directory (Azure AD) application has been created and configured and you have your application ID and secret, it’s time to create an Azure key vault and configure its access policy so a client application can access the vault’s secrets.
An Azure Key Vault is a cloud service for securely storing and accessing secrets. A secret is anything that you want to tightly control access to (such as API keys, passwords, certificates, or cryptographic keys like the one we created in the last step).
You can use the Azure portal to create a key vault. Once you have it set up, you need configure its access policy so that the application can access the vault’s secrets. The create, get, list, sign, verify, wrapKey, and unwrapKey are the minimal permissions required for this exercise (creating a new column master key and for setting up encryption with SQL Server Management Studio).
I’ve created an Azure Key Vault named “johndenverkeyvault” and added an access policy granting the appropriate access to my jim-app:
The Database
Since I wanted to utilize an Azure Key Vault to store my encryption keys, why not use an Azure SQL database? Azure SQL Database is based on the latest stable version of the Microsoft SQL Server database engine and is a snap to set up a server for testing. I won’t spend time here on the setup, but you can read about that here.
Once my database (the “jamesmillerdatabse”) was set up, I used SQL Server Management Studio (SSMS) to connect to it and create an empty table (patients2) for testing this solution. The table is based upon one of the many helpful examples provided by Microsoft and includes a column that is considered to be sensitive in nature:
[SSN] [char](11) NOT NULL
Once the table is created, its time to implement Always Encrypted (again using SSMS and the Always Encrypted wizard). I covered this in my last post (and there are plenty of examples in the product documentation), so I will skip over this step but will point out that there is one key difference and that is in the Master Key Configuration step – that is where you will select Azure Key Vault rather than the Windows certificate store:
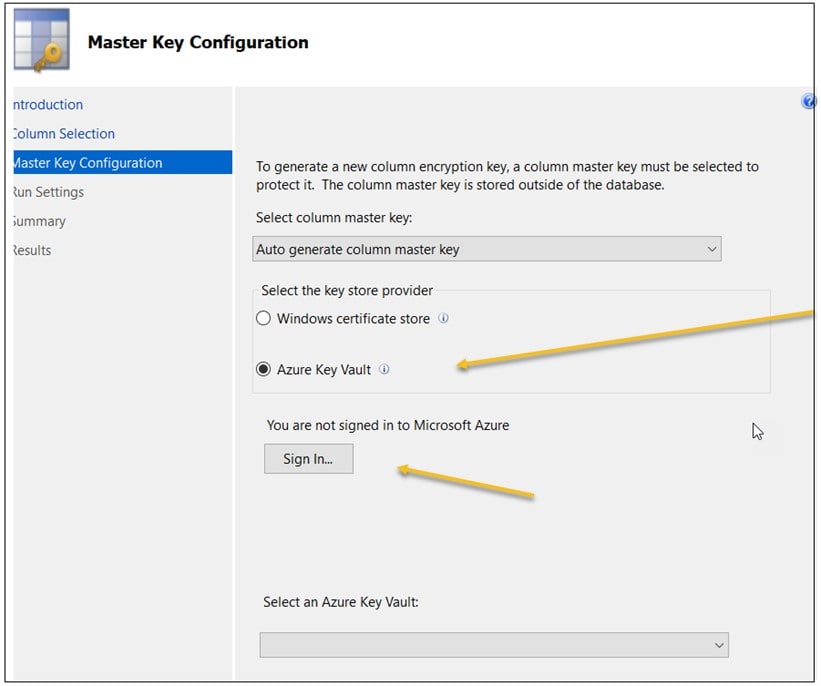
When you select “Azure Key Vault”, you’ll be asked to sign into your Azure account and select the Azure Key Vault that will house your encryption keys.
Now that we have an empty table (with Always Encrypted implemented) if we try to insert a row into the table using a SQL Insert query, we’ll not be successful:

The Client Application
Since this is just an example, with the objective of illustrating how a client application can interface with a cloud-based Azure SQL database using an encryption key retrieved from an Azure Key Vault, I used a simple C# sample application available on GitHub. I selected this sample application because it performs a set of hard-coded SQL inserts and selects on Always Encrypted columns, and it also implements a number of APIs that make accessing Azure Key Vaults straight-forward. Finally, applications need to use SqlParameter objects to pass plaintext data to a server with Always Encrypted columns as this sample application does.
To set up the sample application I followed the following steps:
- Open MS Visual Studio and create a new C# Console App (.NET Framework)and make sure the project is set to .NET Framework 4.7 or later.
- Name the project AlwaysEncryptedConsoleAKVAppand click OK.

3. Install the following NuGet packages by selecting to Tools, then NuGet Package Managerand then Package Manager Console and then running the following commands:
Install-Package Microsoft.SqlServer.Management.AlwaysEncrypted.AzureKeyVaultProvider
Install-Package Microsoft.IdentityModel.Clients.ActiveDirectory
Assuming the following commands executed successfully, the next step is to replace the contents of Program.cs with the downloaded application source code (the sample application source code is also available to simply copy and paste from here).
Configuring the Sample Application
Before you can run the app, you need to make 3 changes. First, you need to replace the value of the string for the global connectionString variable, then set the applicationID value and the clientkey (application secret) values with those that we created in the Azure portal earlier. These three updates are the three lines of code that directly precede the Main method in the code:
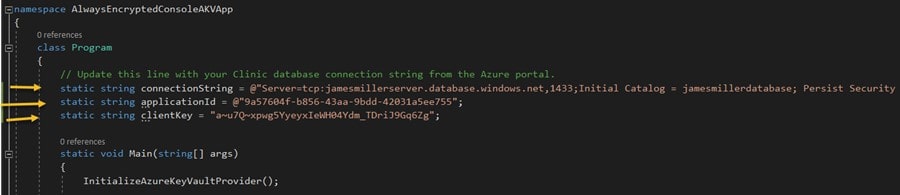
Once you’ve made the changes, save the project, build the executable and then click Run!
Results
This application is a MS Windows console application so you will see the results in a command-line window as show below. The application echoes connection information, asks for the password and then retrieves the encryption key from the Azure Key Vault. Once authenticated, it clears any existing rows in the SQL table, performs a number of row inserts and then queries the table showing the results.
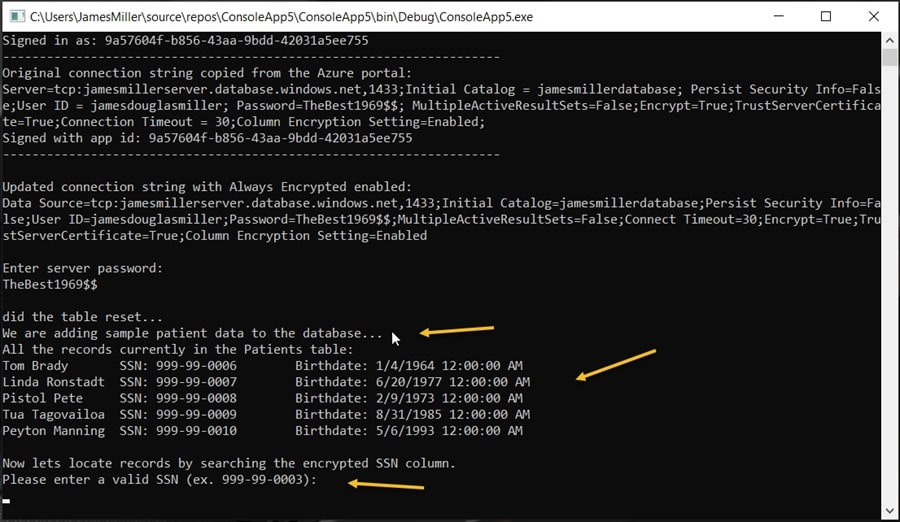
If you are curious, you should take some time to look through the sample application code. The most interesting sections include the section that handles the authentication, where the DELETE SQL command is executed as well as where the row inserts, SQL SELECT all and SELECT WHERE are performed. These lines of code are “ripe” for leveraging in other solutions.
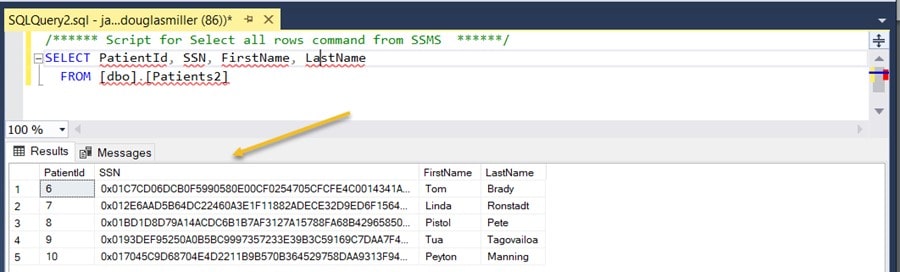
A Final Step
To conclude this exercise, I verified that the data on the server is encrypted by querying the Patients2 table with a simple SELECT command using SSMS. The results show that the patients SSN information is displayed as ciphertext (encrypted) values: