Upgrading PAW on Linux with MobaXterm and QueBIT Script Files
- Environment Setup:
- Obtain a Linux user ID user that has “sudo” rights
- Confirm with IT team that Linux install has all basic components including:
- i. yum-utils
- 11. unzip
- Note that Word may change a short hyphen to a long hyphen so be careful copying and pasting Linux commands from this document
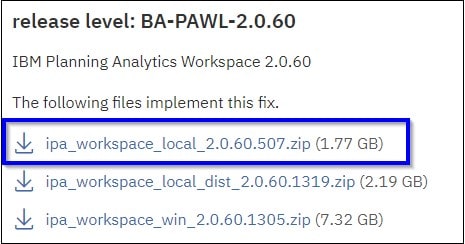
- Download the latest PAW release from IBM Fix Central
- Search for IBM Planning Analytics Local
- Follow prompts to browse all fixes
- Select the latest BA-PAWL-*.*.**.zip file

- Follow the prompts to download the BA-PAWL-* file for Linux
- Save file to the side to be uploaded to the server at a later step
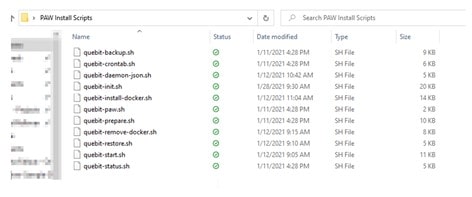
- Obtain the QueBIT install scripts
- Use an SSH client [MobaXterm] to open an SSH session to the Linux server IP addressa
- When entering a password to log into a server, the password field may appear empty even though you have typed/pasted the password in. This is a security feature. Also note that the ‘paste’ shortcut is SHIFT+INSERT, not CTRL+V.
- Ensure your Linux account has been granted ‘Sudo’ administrative access with the below command:
- a. sudo -l
- Once logged in perform the following actions
- Check that there are at least 30gb of available space using the below command: df -h /opt
- Create the below paw directory and subdirectories with these five commands. Note that the ‘2060’ folders below should match the release number of the PAW version being installed:
- sudo mkdir /opt/paw
- sudo mkdir /opt/paw/docker
- sudo mkdir /opt/paw/paw2060
- sudo mkdir /opt/paw/paw2060/quebit
- sudo mkdir /opt/paw/paw2060/backups
- Set permissions to writeable ‘777’ for the paw parent directory and its children using the below command:
- sudo chmod 777 -R /opt/paw/
- Move Install Files to the Server
- Upload the BA-PAWL-*.*.**.zip file to the /opt/paw/paw2060/ directory using the SSH client’s upload feature
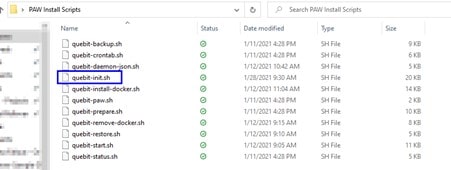
- Open the quebit-init.sh script using a file editor
- Update the three install folder paths shown below
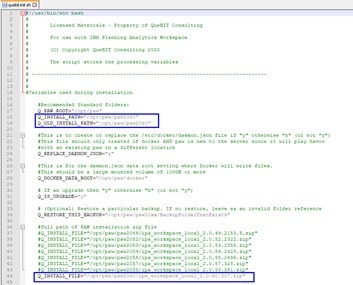
- Update the three TM1 Planning Analytics server locations
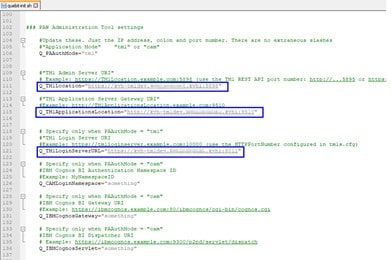
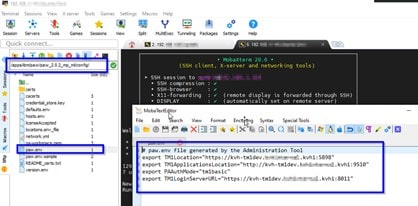
- If there is an existing PAW server, the TM1 Planning Analytics server locations can be found in the /apps/ibm/paw/paw_2.0.2_mp_m/config/paw.env file shown below
- Upload the 11 quebit-*.sh install script files, including the updated quebit-init.sh script, to the /opt/paw/paw2060/quebit/ directory using the SSH client’s upload feature
- Note the installing Linux account’s current ‘group’ membership using the below command: groups
- Add the ‘docker’ group using the below command: sudo groupadd docker 2>&1
- Add the installing Linux account to the new docker group using the below command. Note that “${USER}” is a Linux function, not a placeholder: sudo usermod -aG docker “${USER}” 2>&1
- Apply the new group to the session using the below command. Note the syntax is: newgrp space short hyphen space docker: newgrp – docker
- Check the installing Linux account’s updated groups using the below command. Note you should now see the new docker group included in the list: groups
- Navigate to the QueBIT install script file directory using the below command: cd /opt/paw/paw2060/quebit
- Run the QueBIT install master script using the below command. Note that it will prompt for your password to be re-entered:
- /quebit-start.sh
- The install script should take <10 minutes
- When complete the install log file will be generated at the location below:
- /opt/paw/paw2060/quebit/ q_install.log
- If possible, log into PAW or PAX as an end user to check that everything looks correct by creating a book with a cube view and saving it.
- Reboot the Linux server using the below command: sudo reboot -h now
- Confirm that the server starts back up and that PAW is still successfully running